Tuesday 17 April 2012

Blog 014 – Big Red aka The Crimson Inquisitor.


One of the things that has always bugged me about the fact that certain Inquisitors could wear Terminator armour was that there were no appropriate minis scaled to show normal humans doing so. Yes, there were (and are) plenty of Terminator minis, but they all depict eight foot tall superhuman killing machines rather than normal humans – if the term “normal” can actually be applied to members of the Imperial Inquisition.  During a recent conversation I was challenged to convert one from a standard Space Marine to represent the reduced scale, and it’s quite possible I’ll do that at some point (my so-called friends keep creating challenges that are just barely the right side of insanity for me to consider viable and so I’ve already started thinking about which components will form the basis of it), but on the more immediate front it did make me reconsider an old conversion of mine from a few years ago.
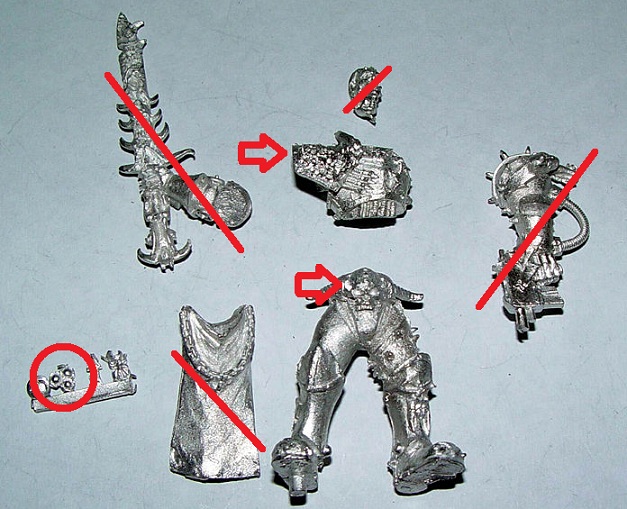
The basis for the conversion was one of my favourite older minis, a figure of a vintage far enough back that it may indeed be from the era of Rogue Trader. I already had the figure made up as a display piece, but it was old enough that it was really showing its age and so it became a donor via a trip through some paint-stripper.


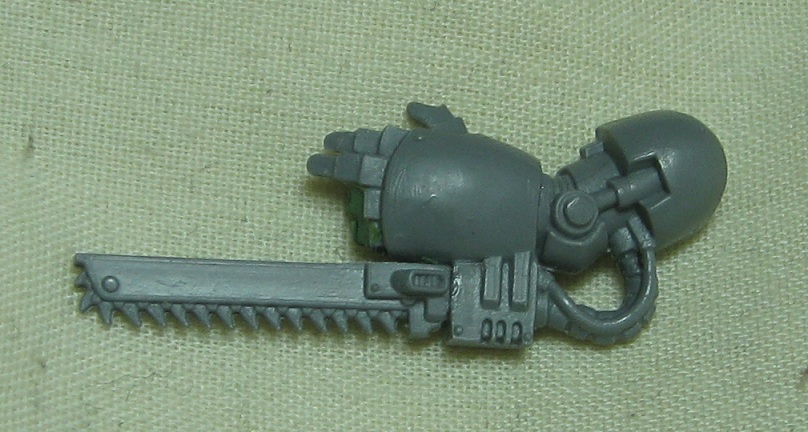
In order to upgrade the look of the piece I grabbed one of the Chaos Terminator arms from my bits-box and cleaned off the unwanted detail and iconography. I simply had to use it – the combination of the power-claw and the wonderfully detailed shoulder-pad was irresistible. I love power-claws. They’re my favourite weapons. If they had them in real-life I’d buy two – one for day-to-day use and one for Sunday-best.
Look closely at the fingers and you’ll see how I’ve curled the middle and smaller fingers in slightly to give a more natural pose. Little tweaks like this can make for the simplest of conversions but still deliver a good-sized visual impact in terms of giving a miniature a touch of life and naturalism.
The main draw-back of using this arm was that it left me with nowhere to put the shoulder pad with the Inquisitorial symbol upon it – you can’t give a figure two left-arms after all. Or can you…
No. You can’t.
What you can do however is remove the left shoulder-pad, reshape the rear so that it fits the right side of the Terminator and then scratch-build an arm and hand for it. And yes, it is a lot of work just to keep a symbol that could just as easily be painted on the finished conversion, but I didn’t get called “Mad Converter” for nothing. You can also see that I’ve used a vehicle-mounted storm-bolter as outlined in Blog 013 – I’m fairly sure this was the first time I did so.
The only other notable addition to the piece was the shrine pinned to the top of the armour. Once again it came from my bits-box so I’m not certain of the provenance, but I’m fairly sure it’s from one of the Black Templar sprues. I chose it because I wanted something that would both identify the Inquisitor on the battlefield and also display the strength of his religious zeal to anyone who faced him. This is a man who is armoured in ceramite and in the armour of faith.
As is common for me the figure was fully based before being broken down into its several pieces and painted in components before final assembly and varnishing. I have to admit that, despite the work I’d done, I didn’t lavish a similar level of effort on the paint-job as it was intended for gaming rather than as a display piece (you may note that the shield is still blank pending the eventual addition of a force insignia).
Although the finished figure isn’t as ornate or impressive as some of the others in my cabinet it still ranks as one of my favourites. It could be the clean lines, the pleasing asymmetry or the martial arrogance of the character, but if I had to admit to a reason why I like him so much I’d have to say that I simply like his overall look – he just seems “right”, if you know what I mean.


Monday 2 April 2012

Blog 013 - A pair of simple Terminator conversions.

An uncharacteristically short blog entry this time, but not because I haven’t been busy. The zombies of my Horror Horde are far more numerous than they were only this time last month (thanks partly to my having found inspiration, partly to my having found a decent feldblau for some of the German contingent but mostly because zombies just naturally seem to increase in numbers if you take your eyes off them for five minutes) and my second novel is finally finished and in the process of being edited. A whole novel of more than 80,000 words completed in less than a year – I had no idea that I’d be able to do it, but do it I did. Now I just need to find a willing literary agent and/or publisher…
Anyway, the idea for this blog came from a conversation with my old friend Steve Buddle. I was telling him what I’d been doing for a Terminator conversion I’m working on when is occurred to me that I’d never seen anyone else emulate one certain part of the process which, for me at least, has become a routine modification.
There are two components of the common or garden Terminator that I’ve converted more than once in exactly the same way (truth be told, the only conversion I’ve carried out more often is the creation of my drum-mag bolters) and those are the Terminator’s arms, bearing their various versions of the storm-bolters and chain-fists. Not that I have anything against any of the components as they come on the sprue, I just prefer to have certain things show a bit more ‘oomph’, if you know what I mean.
First off is an easy one – the chain fist. Step one is to remove all but the drive section of the chain attachment from the fist. Step two is to cut the hilt section from a chain-sword. Step three is to pin and glue the two pieces  together. It really is that simple. The end result is a chain fist with a very long – one might even call it sweeping – chain attachment, and it’s an image that I think provides the finished conversion with an aspect of brute power and devastating lethality. Visually it’s the difference between a dagger and a broadsword. Also note that the two smallest fingers on the fist were removed and wire inserted so that I could resculpt them and create a partly closed hand.


You can also adjust the look of the finished item by varying the chain-sword used. In the above example I’ve used the basic weapon from the tactical set but in the past I’ve used others, including the various double-edged versions of the weapon, to good effect.
The second change is the modification to the storm-bolter. It’s even simpler to execute than the upgrade to the chain-fist, but I think it’s a staggering improvement on the visual of the Terminator. First off I carefully remove the existing storm-bolter (saving the part of course – more than one space-marine in my collection now carries a weapon previously held by one of the first company) and make sure that the top of the is smooth and pristine. Next I trim flat the rear underside of the storm-bolter from the vehicle sprue and glue it in its place. Job done. No, really, it’s that simple. The only caveat is that you have to make sure the finished piece won’t interfere with any other component on the figure, but that’s always the case even if you’re just constructing a bog-standard, unconverted figure.

“But Neil,” I hear you all cry, “from where did you get the idea?” Well, I’m glad you’ve stopped asking why I do these things (that’s a question for very well-educated men with many letters after their names and a disturbing propensity for giving things Latin labels) and started asking how the ideas come to me. The 40k fluff states that storm-bolters were originally nothing more than two bolters strapped together as a combi-weapon and while the newer models still pay a small homage to that visual it’s the ones on the vehicle sprue that more clearly show that development. They have two separate magazines and a clear delineation between the halves so that the body of the weapon looks like two bolters fused together and given a new casing. And so when I wanted to give an old (and I do mean old) model of an Inquisitor in Terminator armour a relic-weapon it seemed obvious to take they one from the vehicle sprue. I liked it so much it’s become one of my staples.
And you’ll be seeing that crimson-armoured hero of the Imperium next time.

Friday 9 March 2012

Blog 012 – Chaos Magus: The Lost and Damned of Nurgle.


I started converting this bad boy as soon as I clapped my grubby little hands on it.
It’s not that I didn’t like the original sculpt, nor the first build and paint-job I’d seen done on it, simply that the unmodified figure looked far too Khornate for my tastes – I mean, this is a Magus, so why would he follow Khorne? And thus I thought ‘What the hell!’ And started my process.
First out were all those components that I couldn’t visualise appearing on the final figure, which included anything that would too clearly show the source of the conversion. It’s a little like when they tell a lady going out for the evening to look in the mirror before stepping through the front door and change/remove the first thing she notices.
Well, I noticed a lot.
First out was the head – it’s the natural focus of the figure and, like most faces, it’s recognisable (there’s a part of our brain that evolved to carry out that one single process of facial recognition). I could have converted it, drilled out the eyes and mouth and resculpted them, but it was actually easier to redo the whole component and just sculpt a new head from scratch.
Next out were the arms. I wanted to modify the pose as well as give the arms some innate character so it made sense that I should resculpt them too. Losing the sword arm was easy (that sword was just too recognisable) but the gun arm was a real wrench – I liked the look of it and the eventual replacement had pretty much the same pose even if it carried a scythe rather than a pistol.
The loin cloth? Gone. The icons? Gone. Well, except for the Nurgle one of course – and that ended up on the inside flank of the gun (it’s barely visible on the finished piece, but I still know it’s there).
The skull on the Magus’s belt was painstakingly sawed off and saved for a future conversion (again it was too recognisable and just too beautiful to be clipped away to end up as nothing but scrap) but the horns were ground away, as was the detailing on the chest and shoulder. I still feel bad about that last bit of work – I hate to think how much effort had gone into creating that repetitive skull motif so, if the sculptor is reading this, I’m so sorry. But it had to go and so go it did. A little bit of clipping hollowed out the belly as well.
The first cuts were to extend the right leg to give the figure a more heroic pose – I added a few millimetres in total, but it led to a real problem with the left leg. The shin was a smooth curve with a beautiful face sculpted into it and thus pretty much impossible to cut – if I did it would require grinding out all that work, resculpting from knee to ankle to keep the curve, restoring the detail… No, just too much. Plus I simply didn’t want to destroy that face. So I gave him a hoof instead of a foot.
Okay, there was actually a little more thought to it than that, but that’s what it all came down to. I thought about styling it as a cloven goats hoof, but instead chose something closer to that seen on a horse – I preferred the aesthetic.
Before I sculpted the arms I created the weapons. The scythe was a complete scratch-build, entirely constructed from green-stuff over a copper core and with a plasticard and miliput blade, but the bolter was built up from my bits box. A plastic Ork shoota formed the centre of the weapon with a muzzle from the chaos vehicle sprue replacing the original. Additional detail was added with plastic-strip, green-stuff and telescoping brass tubing (ironically one use was the telescopic sight). The final touch was adding the Nurgle icon to the left side of the weapon – a little like a maker’s mark I suppose. Originally I intended the weapons to be in the other hands, but the presented scythe created a lovely framing line for the figure and so it ended up as you see it now.
The incomplete legs were attached to a temporary base and a hole drilled into the waist to attach the truncated torso section. That was when I used miliput to bulk out the gaps and give them solidity – I almost always use miliput for structure or armour and green-stuff for detail. The right shin suffered from the problem I foresaw in the left as outlined above, plus it looked too skinny, so I added a jutting shield-shaped piece of plasticard to give it some visual impact and blended it in with miliput. A hook from a vehicle sprue became a primitive spur on the rear of his boot.
Holes were drilled into the dents where the arms would have gone and more copper wire glued into place. I drilled a hole in the neck as well, but the head wasn’t even started until later. Still, it’s good to plan.
What I had was a VERY ugly stick-figure, so it was time to add detail. The belly was sculpted, another icon from the chaos vehicle sprue used as the biggest belt-buckle in recorded history. Some sort of tube was run out to a truncated plasma bomb which was itself pinned to the waist. You know what? It’s easier if you just look at the pics, but I can sum it up by saying that a lot of sculpting and dickering went on.


The words running around the armour edge were really easy to do but look as if they took a lot of effort. All I did was scribe the line into wet green-stuff, break it up into the right sized sections with vertical strokes and then used the triangular tip of the wax5 to just push down on the bits that were supposed to be indented. As I said, it’s a simple technique – but I doubt that my description of it has done it much justice. And if you’re having difficulty reading it the script says “Lost and Damned of Nurgle”.
The arms were scratch-built in two stages. I completed the basic structure in-situ before removing them for separate completion. Whenever you sculpt a piece away from the figure take one little piece of advice – test fit it constantly. You don’t want to get to the end only to find that the damned thing doesn’t fit any more or is blocked by another component.
The head was sculpted entirely separately and with no neck. I pinned it into place, posed it until it looked right and only then added the throat and neck muscles. That’s an old sculptors’ trick and really does pay dividends allowing the final look of the figure to be tweaked – the last piece I add to most of my conversions is the head.
The figure looked good, but didn’t look right until I added the sculpted back-banner. Last on was the pennant hanging from the banner-pole. I thought about putting a skull up there or even a rotting head, but felt it would have been too “on the nose”.
And that was the magus finished. Well, apart from the painting. And that was the scariest part of all. The raw figure, bare even of the undercoat, looked wonderful, full of possibilities, and by starting to paint it I reduced the infinite possibilities incrementally to just one.
But that’s a subject for another blog.


Wednesday 22 February 2012

Blog 011 – My horror horde.

You've seen it mentioned, you’ve seen the carry case, so it’s probably time that I told you about it.
Years ago I bought some of the early Secrets of the Third Reich Zombie Germans by West Wind Miniatures, but was less than impressed with their separate heads. They were a trifle oversized and a little too cartoony for my tastes, although I loved the rest of the minis as well as the actual plug-in head system.
I decided that it would be a good idea to sculpt a single head as a replacement component for the entire squad and Steve Buddle was kind enough to say that when I’d finished it he’d add it to his next master-mould so that I’d have enough of them to go around. The problem was that I hate wasting any excess putty so I ended up using any leftovers from what became head number one to start work on a second head. When the first head was finished the second was only half-done and so the excess was used to start a third. And so on and on and on and on… I couldn’t stop. The bloody things multiplied like the brooms in “The Sorcerer’s Apprentice” until I had nine of them and was working on the tenth. I actually had more heads than bodies.
‘Why don’t you just try sculpting the rest of the figures?’ Steve suggested in that infuriatingly reasonable tone of voice that he uses (he used that same tone when he said ‘Why not put his armour on top?’ when I was converting the Dreadnought featured in Blog 003). I wasn’t keen on the idea as I didn’t have that much faith in my abilities, but I gave it a go and was more than happy with the end results. The process itself was fun, instructive and therapeutic and I thoroughly recommend it to anyone even tempted to try sculpting. I ended up with five Zombie Nazis, each with two heads sprued to the base, which formed a part of Steve’s “Spyglass” range for a little while until the rights were sold to Brigade Games. If you fancy checking them out the greens are shown here at http://wk.frothersunite.com/sc/pulp/wwwgerm.htm
Brigade Games also bought my next two sets of Zombies; four WWII Russians and a similar number of modern/near-modern civilians, all with interchangeable heads. All are visible on their site. [I also have some half-finished Brits too which are very much on the back-burner – but wait until you see the green that is the only true Buddle/Roberts co-operation]
As an aside, I rather like the fact that each of the figures is effectively a conversion since it’s the modeller’s choice as to which head he or she wants to use with which body – and at which angle and inclination they wish it to be glued. The shot at the head of this blog shows a representative group of these zombies (I call the civilian and Russian zombies with missing torso sections my “shark-bite specials”, though what a shark might have been doing on a battlefield I haven’t the faintest clue).
With the hefty box of castings I received from Brigade Games my horde had an excellent beginning and I started adding to it from my existing miniature collection. In the 28mm section there are two groups – monsters and humans – because you can’t have a bad guy without a good guy to fight against him so I’ll list them separately.
And one quick note about today’s photos. Some of the figures have unpainted bases and are unvarnished while some are just undercoated but I’m showing them anyway. The only ones that I haven’t taken pics of are those that are merely half-painted, but as and when I finish them the interesting ones will no doubt be seeing the light of day on this blog.

OTHER BAD GUYS
The Munchkins from Steve Buddle’s zO range (currently out of production, but coming back soon through another supplier) look like zombified children or midgets and have wonderfully haunted expressions. Conversion-wise I limited myself to repositioning and swapping the heads with the occasional feature or scar added for effect. I well remember the frustration of trying to add an ear that just would not work properly – so I scraped it off, started again and it worked perfectly the first time. When I painted the Munchkins I tried out different flesh techniques on each so that no two thus far have the same colouration. If you’ve seen these lovely little sculpts you’ll know how cleanly and crisply detailed they are and I found then to be an absolute pleasure to paint – I’m seriously looking forward to whatever it is that Steve is currently doing for GW in their design studio.

[Also from zO there are a couple of long out of production Scarecrows, and lovely they are too.]
Other Buddle sculpts co-opted into the horde include a clutch of his highly-detailed zombies (including the creepy zombie-girl he produced and a version of the fat-man that never saw general release) and two tiny little Imps from a Chaos Champion he sculpted for CMON. Two nude Succubi are also part of the Horde, one with wings and one without, because in my humble opinion you just can’t beat Steve’s mastery of the female form.


On the non-Buddle front there are several entries. The first is a Killer Klown figure from an unknown company which I modified by giving him a hand on a cane (his original hand was long gone but I seem to recall it held a pistol, a look which I never particularly cared for) and a better set of fingers holding the wickedly dangerous cream-pie.
There are three 25mm killer-robot types produced by Ground Zero Games known as Boomers (BU55 Combat Boomers if you want the full nomenclature). These guys were the antagonists from one of my favourite Japanese Animes, “Bubble-Gum Crisis” and captured my imagination as soon as I saw the show (I’ve been chasing after a 1/6th scale vinyl/resin version of one for years, but have had no joy as yet). These figures date back to the 1980s and formed part of the only authorised range from the animation – I’ve no idea whether they’re still available anywhere, but after so long I rather doubt it. I trimmed them off their bases and also extended/resculpted the lower legs of two of them (shown by the little red arrows) as they stood a bit short next to modern 28mm figures.

A handful of old GW figures now grace the Horde too. There’s a Shambling Mound that looks not a million miles away from the old Swamp Thing comic character, something that could have been a clay-golem (well that’s what it is now) and an old ghoul mini with a sickle. There’s also what looks suspiciously like The Hunchback of Notre-Dame – he was a chaos thug armed with a club which I planned to replace with a bell from the Empire Flagellants set, but in the end I decided I preferred an empty hand.
The final, and perhaps most notable addition, is the Rackham Zombie Werewolf conversion from Blog 008.


HEROES
Some more Steve Buddle sculpts made an appearance in this category including a Buffy-esque co-ed with a stake, the current Dr Who (Matt Smith, just in case it changes while I’m sleeping) and two venerable looking monks of very different styles.
Foundry do several sets of thinly-veiled characters from the “Dad’s Army” TV series under the banner of Home-Guard Heroes. I don’t have many of them – just Mr Yeatman the Verger, Warden Hodges, Mrs Fox and Private Frazer dressed as a nun – but they are wonderfully characterful little sculpts and were a joy to paint.


From Artizan Designs I bought a large amount of WWII German and Russian soldiery, as well as a few characters from their Thrilling Tales range. Some reviewers have criticised them for lacking the crispness seen in other ranges, but I think that they’re delightfully distinctive pieces with bags of charm – if I didn’t I wouldn’t have spent good money on them. They came with integral bases which required removal using tin-snips, razor-saws and pin-files. Some of the feet were a little too small to conform to the proportioning conceits of the 28mm scale in the figures I already had so I snipped them off, pinned the miniatures to their new bases and started resculpting. Joking aside I didn’t do this lightly (that’s a lot of feet to sculpt), but I always feel that if a job’s worth doing then it’s worth getting stupid over. And by the end of it I was a dab hand at sculpting boots.


And finally, there’s the giant-killer-war-robot. Originally a 1:35 scale kit from a Japanese anime series that I’d never heard of and can’t remember (if it ain’t PatLab or Robo-Tech I just don’t care) I tweaked it a little by shifting the weapon to the left arm from the right, giving it dual ammo-feeds and extending the barrel so that it looks like a tank-busting long-gun in the process. Oh, and sculpting replacement hands from scratch. The base was constructed on a stack of three CDs super-glued together with the raised levels formed from balsa sheet and the texture-work was added using various types of plasticard, plastic-tubing and similar model construction materials. Like the Zombie-Werewolf I’ve tried to avoid adding anything that ties the piece too closely to a particular scale so that, while it’s roughly 54mm scale, it can still be used at 28mm. The only problem is that he’s far too big for the case.
A note on the painting of the bot. I spent ages blending the colours on the armour plates, making sure the shading was subtle and the highlights not too overbearing. And the matt varnish knocked it all as flat as a pancake. I might go back and reshade it at some point, but I doubt it – it took so bloody long the first time that I don’t think I have the heart to face it a second time.

Monday 13 February 2012

Blog 010 – How to base a figure without having to drill through metal.

In one of the threads on the WAMP forum recently someone asked for advice on how to surface a base with textured plasticard and I thought that it would be a good subject for a tutorial. It’s something that can prove difficult at first sight, especially with metal figures on base-tags, but really it's simplicity itself, and one of those things that can be done in batches.
In the examples below you’ll see that I’m using a zO Munchkin from the Spyglass range of figure formerly produced by Steve Buddle. [As an aside I have to say I just love these figures. They look suitably grim and mindless and are a dream to paint with crisp, neat detailing.]
Step 1
I glued the base to the smooth side of the plasticard using a little liquid-poly. If the card’s texture has a regular pattern with a definite axis (as the one I’m using has) this is where care must be made to orient it correctly so that the front of the base will be in the right direction. All of my Horror Horde are oriented in the same direction as you’ll see in the examples below.
Step 2
I cut roughly around the base to leave a jagged shape. As you can see it’s far from circular at the moment.
Step 3
Using a pair of straight-edged nail clippers (the straight ones are for toe-nails I believe) I trimmed the excess away leaving a faintly jagged edge. A flat-faced needle file took these away leaving a smooth edge. Okay – not that smooth in close-up, but this is just a quickie base for this tutorial and is certainly fine for one of the numberless legion of my Horror Horde.
For plastic or resin figures this would be the point where I would glue the mini in place, but I want to cover a simple technique for mounting metal figures as well.
Step 4
Here’s the figure that will grace this base prepared for eventual attachment. Note how the remnants of the base tag are very definitely pointed with the top edge right by the Munchkin’s foot – this gives a cleaner punch through the base as well as ensuring that as little of the tag as possible remains visible. Note also the pilot-hole in the base goes into the gap where the slot is. There is a reason that I have left a tag on only one foot while filing the other smooth, but I’ll come to that later.
Step 5
A good, firm push so that the peg on the Munchkin goes about half-way through defines the edges of the finished hole and sharp and pointed craft-knife finished the job.
Step 6
The figure seated in place, ready to be glued and painted. It’s after the figure is secure that I add rubble and other details.
A final note here about posing and gluing. The reason I left just one foot pegged is that it allows me to turn it slightly about the ankle, bringing the figure closer to the rear of the base if it is too far forward. I use a two stage gluing process with this as well to prevent flooding the textured plasticard with glue. First I put a thin smear of super-glue on the flat foot (really, the barest needed to hold it in place) then attach the figure as you can see in Step 6. Turning the mini upside down the peg in its slot is then flooded with more super-glue which, when cured, locks the figure tight (I use a shot of zip-kicker to speed this process up). This way I get a really secure attachment without any glue covering details on the base itself.

Monday 6 February 2012

Blog 009 – A different kind of conversion.

In response to Steve Buddle’s blog on what he does with his painted figures (itself based on a WAMP thread) I decided to show you what might well be my largest conversion. No, really. She’s got to stand more than 4 feet high and about 18 inches wide, which is a damned good size for a conversion.
“But, Neil,” I hear someone ask (even if it is just the voice in my head), “what is it that you’ve converted? What fresh insanity has gripped you?”
Well, many insanities have gripped me over the years – for instance, throughout most of 1993 I believed that I was the rightful Emperor of Thrace – but this bout of dementia was one of my favourites and involved love at first sight.
And zombies.
Hopefully you’re intrigued – possibly you think that I fell in love at first sight with a reanimated, female midget – but I’m betting you’re still reading.
A couple of years ago Steve was living in a picturesque house on Dominic Street in Truro (a blue plaque wil no doubt appear there soon) and to visit him I had to walk past a little music shop, one of those pokey little establishments that seems designed to drive custom away rather than entice it in. One day, as I passed the shop’s dusty windows, I saw that something beautiful stood behind the glass, something that called out to me with a siren song. I just HAD to tell Steve about this beautiful addition to my world and explain that, while I simply had to have her, I couldn’t afford her. His response was to commend the strength of my resolve, applaud the willpower to resist and then bet me that I’d have made a purchase in less than thirty minutes.
He was, of course, wrong. The little card machine was on the fritz so I had to get money from the cashpoint which took me an extra five minutes. But I managed to knock twenty quid of the price and acquire my little darling for less than fifty.
Back at Steve’s… First he claimed a moral victory and then he admired my acquisition.
Yes, I know I’ve not yet told you what it was that I bought, and it’s started to sound like I may be involved in the slave trade, so here’s a picture.
Isn’t she wonderful? A “Day of the Dead” hard-shell guitar case with a print of Bub on the front, although the photo really doesn't do her justice. Yes, she weighed a tonne, was a pain in the arse to carry home and was lined with revoltingly ugly purple fur, but hey – no love is perfect. That’s why I converted her.
First out was an internal section with an embedded electronic dohicky that a musician would use to tune his electric guitar. As it was cunningly glued and stapled into place I used a subtle blend of brute force, mindless violence and pliers to tear it out and put it in bin-bags. The battle was hard fought, and many lives were lost, but in the end I was victorious. Next came the fur lining. Pliers, bin-bag, done (although six months later I was still finding bits of purple fur all over the place).

All I had left at that point was an empty box with some frame supports glued in to stop it from splitting apart at the seams.
The next step was getting the foam inserts. First I crossed the road to the local hardware supplier/warehouse (it is quite literally across from me) and had two strips of lining foam cut to give me a flat base on the bottom of the case and a soft top to protect my minis when the lid was closed. I was also able to specify the thickness of the foam which gave me a precise set of internal dimensions, allowing me to order the appropriate sized trays knowing that they’d fit perfectly. The trays were supplied by the inconceivably helpful guys at KR (http://www.krmulticase.com/) after a discussion on the phone where I told the owner what I was doing, why I was doing it and where we both agreed it was a perfectly valid way to expend my time and effort. The advice he gave me was invaluable, so when the trays came through (two for my 54mm and monstrous 28mm miniatures and four for my 28mm minis) they fitted like fingers slipping into a glove. People of KR, you are stars.
And that really was it. Apart form filling the first of those little compartments with painted minis. The choice was, of course, obvious – zombies. And so the first members of my Horror Horde found their home within what I hope you will agree is a truly singular carry case.
As to the Horde itself, well that's a subject for another post.

Tuesday 31 January 2012

Blog 008 – The sort of thing that sane people just don’t do.

Years ago I bought one of Rackham’s Wolfen Zombies with an eye on converting it, partly because of my strange compulsion to modify figures but also because no-one seemed to convert Rackham’s miniatures. I liked the figure, but I wasn’t really inspired by it and as a result it sat in a box for ages, slowly gathering dust until a use for it cropped up on another project.
As an extended sculpting exercise I had produced a clutch of 54mm modern Zombies. It was when I was starting to use green-stuff for the first time and Steve Buddle had suggested that I practice by creating something I enjoyed. It’s good advice – practice is more effective when the process is pleasant – and it paid dividends as I ended up with ten very cool Zombies as well as a huntress to take them on.
Through a few vagaries of fate I ended up with a small number of resin castings of my living dead and so I thought a horror-horde might be a good idea (okay, I’d already started a 28mm horror-horde, but this was 54mm – totally different, I think you’ll agree). And what is a horror-horde without at least one Werewolf? That’s right – it’s not fit to bear the label. So I hunted around, dug out that old Wolfen and considered it.
And then mentally cut it into pieces – always a good start.  It’s my version of ‘measure twice, cut once’. With an image and idea in my head I started work in earnest.
First step was the removal of the scythe. I’ve never seen Zombies or Werewolves as tool-using creatures and in my mind a combination of both wouldn’t be toting any weaponry into its fights, even if that weapon does look kind of cool. So off came the scythe parts… Then I pinned them together, restored some damage detail to ensure they looked like a single component, and dropped them into the bits box. I know it seems an odd thing to do, but I find that completed components are more inspirational to my “process” than disjointed scrap parts. Plus it’s a simple way of keeping matching bits and bobs together.
Back to the Wolfen. Next I drilled up through his feet, past his ankles and into his shins (don’t worry, he didn’t feel a thing) and then cut his feet off. After extending the drilled shafts almost all the way to the knees two sturdy brass pins were inserted through the feet and up into the shins, leaving a portion exposed to lengthen the lower leg. By drilling the holes before cutting the feet off I ensured that the holes would align, saving me having to fiddle with the heavy-gauge rod I use for such things (incidentally, I used the same trick when I extended the shins of my Lorgar conversion, but that’s for another blog).
At this point the figure’s stance was very wide – ridiculously so – so I reduced his footprint by cutting his right leg off and repinning it at a more vertical angle. This also had the effect of giving him a two-level stance which has become an occasional trade-mark of my conversions – I think it gives a figure a heroic aspect, but that’s just my opinion. At this point I also roughed out a temporary base so that I could be sure that the finished figure would look balanced and stable. That was the leg section done, so next came the body. [Before I go on please note the indicated section of cloth wrapping – you can clearly see that I used a thin strip of plasticard as a former before sculpting over it]
The big change to the torso was the removal of the original belly section with clippers. The figure was going to be straightened to stand more upright and so I had the choice of cutting and pinning and restoring more lost detail to “un-crunch” the belly or just resculpting it from scratch. I chose the latter. I drilled and pinned the thorax to the hips then put a core of miliput around the rod to form the core of the abdomen as well as a basis for the detailing to come. Greenstuff would be sculpted over it, but I find that inflexible miliput gives a much stronger structure.
More cutting and pinning pulled the right arm back in line with the torso and I also took the opportunity to twist the hand about the wrist. I also added a little length to the fore-arm, but the main change was to grind down some of the existing musculature for when I would need to resculpt it (as I outlined in my earlier blog on anatomy). The left arm was more challenging, requiring me to clip away the entire existing shoulder before pinning and restructuring with miliput, just like the abdomen. At this point I also scrapped the right hand – it just didn’t look very good closed so I decided to sculpt a brand new one.
Finally, the head. The big change here was using a razorsaw to split the ears apart (as you can see from the pic at the top of this blog), but I also chose to glue it turned slightly to the right, again to create a more dramatic effect.
Then it was a lot of work with greenstuff to restore lost detail and create some all new features, plus a bit of basing work to create a suitable scenic base. The following picture shows clearly how I first resculpted the musculature of the shoulder before restoring and extending the hair detail.
With this picture of the neck and upper arm you can clearly see how I have attempted to match the newly sculpted sections with the style of the existing pieces to create the appearance in the final painted piece of an unconverted miniature (as my regular readers will know by now my aim is always to create that illusion).
The last step was to create a more detailed base, including placing a hand and forearm clipped from one of my zombie miniatures within the rubble – it isn’t prominent enough to define the wolfen’s scale as 28mm and could just as easily be a child’s arm as an adult’s (so this is a 28mm and a 54mm figure).
Am I happy with the finished product? Not entirely, or at least not quite yet. The only real change is that I’m sorely tempted to grind out the thumb and first three fingers of the right hand and resculpt them as a looser fist – I not entirely convinced that I like the tightly current clenched appearance very much. Once that’s done I’ll have a nice Zombie-Werewolf to eventually paint as well as a very rare example of a converted Rackham figure.
You know just writing that makes me worry that some part of my psyche just wants me to do the sort of things that other hobbyists consider either crazy or simply not worth doing… I’ll happily admit that this could be the case, that I may indeed have some sort of mental defect, some flaw to set me apart from those the world labels sane, but if so I can also say that I have a kick-ass Wolfen Zombie and they don’t.
Coming in future blogs – a detailed breakdown of a conversion from start to finish, a tutorial or two and ZOMBIES!